Rich's Viking Guide
At one time I was doing 5 Settlements at a time. As you can imagine, I didn't have a lot of spare time to babysit each settlement. Going from one to another also posed issues if I followed the Questline. In short, that route just didn't work. I found that by just focusing on one Good at a time, I could move all my settlements forward at pretty much the same pace. When I finished with Axes in one, the second one would also be close. I found that this method saved a lot of time and cut down on how many times I needed to build each settlement.
So at its core, you'll have 3 or 4 goods buildings just making one good, you may have 1 odd building producing goods to unlock the building of the next good (i.e. You may have 3 Smiths and 1 Brewery making goods to unlock your Hunter). Enough Shrines to produce coins to keep your 4 goods buildings going, and enough population for the shrines & goods buildings.
At its peak, you want your settlement to have 12 expansions (4 initial & 8 purchased), 4 Goods buildings, 10+ Shrines, and 6 huts.
Day 1:
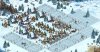
If you have impediments, your buildings will have to work around them. You may need an expansion or two to catch up or you'll need to get creative placing your buildings. Below is a typical starting city:

This has no impediments, so it allows for immediate placement of shacks, roads, and runestones:

When the shacks & runestones finish, you can go to your Quests and complete 1-4. Once this is done, sell your runestones and add your second Smith:

After your first hour, both Smiths are ready to produce, go ahead and set these both for 8hr productions. You'll have two shack collections before the Axes are done. For those of you who have drawing programs, they can be a big help. I use OpenOffice which is free and has a drawing program included. I've taken some screenshots and made cutouts of all the Viking buildings. I set up my grid to match the settlement and exact building sizes:

I mark which expansions I want to purchase, place the impediments, and build my settlement ahead of time. That way I can move my buildings around to give me the most production I can. This is very handy if you have to work around impediments as you may see a configuration and try it out before having to touch your settlement. In this picture, I've already chosen which two expansions I'll purchase as well as what my shack, smiths, and shrines will look like.
So once my Axes finished, I simply build my settlement as pictured and continue on:

.
Resources:
These play an important factor in your order of production. My first consideration is Mead when starting, those are bigger buildings and require less population, so that may allow an extra shrine. Arranging my city around the bigger buildings first also allows for an easier transition when I start on Axes or Horns, those 3x3's will fit in the Brewery's 3x4, but not the other way around.

In this playthrough, Axes have the majority, and wool is also pretty high. This simply means that I'll need at least 2 days for Wool, so I may need to rush the questline a little bit faster to unlock Wool sooner. But since Mead & Horns are very close, and my mead will be counting down as I produce more to unlock the Beast Hunter, I may only need two Breweries by the time I get all 12 expansions.
Faster Coins:
You'd think that the longer something produced, the more it would make. In FoE, the opposite seems true and can be compared to tables at a resturant. The longer one couple sits and eats, the less money the restaurant makes. That same table could have 3 or 4 couples in the same time period and quadruple the money. Same with Shrines:

In 5 minutes a Shrine can make 16 coins which doesn't seem like much compared to 113/hr, or even 449 in 8hrs. But let's compare:
You can make 12 5m collections in an hour, so 16 coins x 12 collections = 192 Coins/hr, 768 coins/4hrs, 1536 coins/8hrs
You can make 4 15m collections in an hour, so 38 coins x 4 collections = 152 Coins/hr, 608 coins/4hrs, 1216 coins/8hrs
You can make 1 1hr collection, so 1 x 113 = 113 coins/hr, 452 coins/4 hrs, 904 coins/8 hrs
At 4hrs, you get 300, 600 at 8hrs.
And at 8hrs, you get 449.
So by cleaning your tables faster, you can get almost 4x the number of coins in 8hrs doing 5-minute productions. This is also a way to catch up if you fall behind and need more coins. Just go to shorter production times.
I need a drink:
So as you rush your few shrines to keep up with your goods, you will only be able to keep up with the 4hr productions initially. Meaning you'll only be able to produce 2k of coins in those first few 4 hours. So as soon as you get enough Axes, buy your third expansion and add two more shrines (which will require two more shacks). You're basically at 1 for 1 right now, you need 1 shack for every 1 shrine. But you'll max this out at about 6 shrines.
So now my settlement looks something like this:

To get all 6 shrines, I had to move the bulk of my shacks offroad. If you can't keep up with the 5-minute productions, then it's probably better to keep it down to just 5 shrines with most of your shacks still making coins. The shacks can sometimes meet the gap your 15 or 1hr collections will leave.
Eventually, you will get enough Axes to unlock your Brewery. You should have enough shrines to give you the culture, but if not, sell one Smith, build enough runestones in the space, unlock the Brewery, then build it. I had already mapped this out in my drawing and found I couldn't hit all 6 shrines, so I also sold a shrine and a shack to allow me to reconnect 8 shacks:

So now that I have both Mead & Axes coming in, my next steps will be to add my next two expansions using Mead. This should allow me to add back in 4 or 5 more shrines and allowing me to go to longer production times. I'll cover that in my next post.
 Omnis Facies
  :
:


 Guild Expedition